In between the ITS ranked tournaments IGL runs casual tournaments that are not logged into ITS, and either has a homebrew twist, or are an opportunity to test recent major changes or additions to the game. The current casual IGL has both a twist and new changes to test. The twist - the Space Magic ruleset - will be covered in depth in a future, but for this battle report the recent changes made to the game are more relevant.
Some of the most meta defining changes made in the tradition from N4 to N5 are the introduction of the speedball mechanic, and the changes made to super-jump. Speedball upon release allowed a friendly unit - for the measly cost of a single command token - gain access to what in effect was an additional wound or a mulligan against states like isolation and immobilized. Meanwhile the changes to super-jump turned what was the decidedly inferior vertical mobility skill when compared to climbing+ to an extremely powerful skill that allowed it's users to traverse the entire table with a few orders. In concert, these two changes made defending null deployments somewhat difficult in early N5 and were especially powerful at defeating jammers, direct template wielding corner guards, and hacking area control.
Corvus Belli, however, has tried to address some of the concerns surrounding super-jump and speedball. A recent update featured a minor rework of super-jump that prevented the skill from being used twice in a single order and effectively front loads the extra movement granted by the skill, meaning units with the skill cannot move as far over an entire order but move further in a single short skill. This update also changed the wording on speedball - only allowing the vitapack, autorepairs and switch-on speedballs to be applied from one friendly unit to another via a shortskill.
While I'll save further elaboration for a post dedicated just to my thoughts on this topic, Vanilla Haqqislam is an interesting spot as a result of these changes. Pre-update speedball in particular was a particular thorn in the side of Vanilla Haqqislam, seriously denting the effectiveness of their best defensive piece - the Ghazi Muttawi'ah and it's jammer. I think there is great potential for Vanilla Haqqislam to be a strong faction - but much of the set ups and archetypes remain unexplored. Testing out some of these archetypes and set ups is my main goal for this current IGL - seeing what works, what feels good, and what doesn't.
So with that all out of the way, the first round of the tournament.
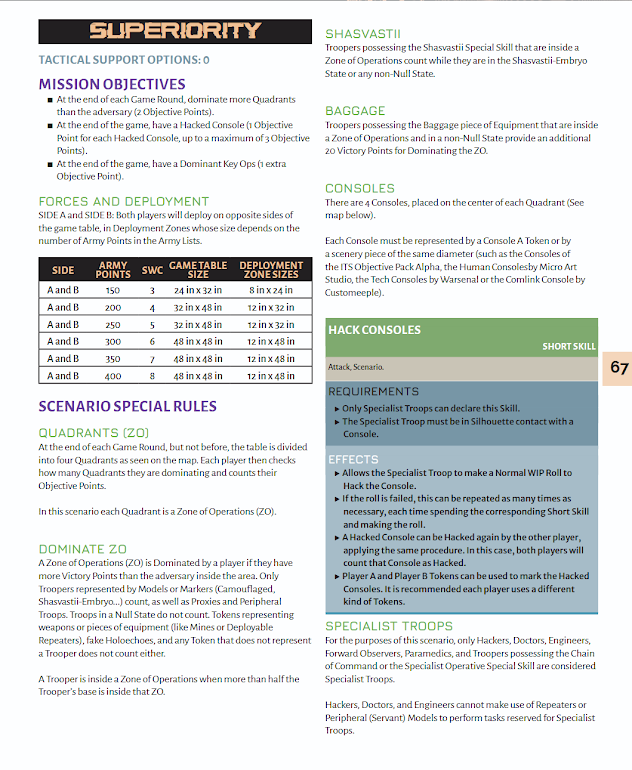

Superiority is one of the Direct Action missions which do not feature any classified objectives, and typically lack a lot of extra rules like the QAZ creature and INTELCOM card rules that are featured in Supremacy, Superiority's non-Direct Action counterpart. With end of round zone control based scoring being predominant, Superiority is obviously a second turn favored mission. The mission also features consoles that can be claimed via a short skill but are notable in how both players can control the same console at the same time. This somewhat unique console scoring method is far less second turn favored than the traditional method of mutually exclusive control of consoles.
There isn't much more that can be said about Superiority - it is fairly straightforward zone control mission that is fairly second turn favored.

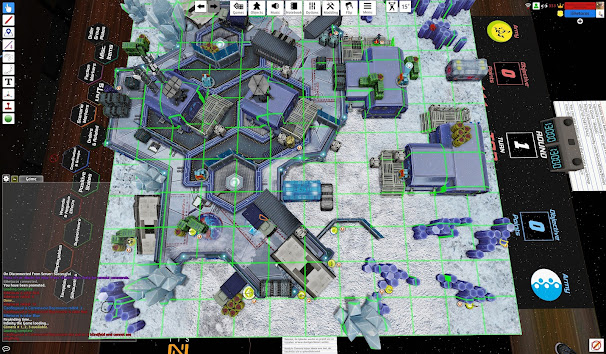
The maps for this IGL are randomly selected by the players from a pool, with this map being the one my opponent and I rolled. This is a rather open map with long, open sight lines easily available from the T-shaped buildings on the left, and some of the containers that run through the center from top to bottom. Given that dominant positions are available that can draw sight lines to the majority of the map, it's somewhat hard to draw this map into individual fire lanes or corridors. There is enough scatter density to make deployment feel relatively easy for small S2s, but hiding large silhouettes like TAGs and Hoverbikes is a struggle. A strong gunfighter with access to a mobility skill - like a Zeta, Tikbalang, Tarik, or Go-Pod - will most likely be able to really threaten large silhouettes on this map, and might even be able to find angles on prone S5 and S4 troopers.

This was the list I utilized for this game. The general game plan is to leverage the Maghariba and Mukhtar as my main gunfighters, with Maggie also potentially assisting as a hard ARO depending on the game state. For asymmetric threats, the Hunzakut, Fiday, Ragik, and guided missile package all make for compelling pieces. The Nadhir is here partially as insurance for the Maghariba. Maggie is still the largest thing to game and as a result sometimes quite difficult to hide - as she was on the map this game was played. The intent is that even if my opponent can bring an anti-TAG gun to bear against Maggie, revealing the Nadhir at the right time can turn the fight in my favor, or at the very least cause enough inefficiency through split burst to let Maggie survive the engagement.
The Ragik is an interesting piece that is cheap, durable for the cost (dogged and shock immune) and fairly maneuverable with parachutist/combat jump and super-jump. The idea here is that it can serve as a close assault piece, either sweeping the midfield or diving the enemy DZ. It lacks the outright lethality of similar units in the role like the Asawira or Zuleyka, but is entirely immune to being struck down before it can act, can potentially exploit gaps in my opponent's positioning better, and has an edge in terms of vertical mobility.

The most striking and obvious element of my opponent's list is the double Wrecker set up. In a fireteam duo with the +1 SD bonus, it makes for a decently compelling hard ARO thanks to the innate durability of the Wrecker, and an obviously powerful set of active turn guns. The core team can do some backup gunfighting as well with the combi rifles on the Silverstar and the PSI-Cop. The lack of MSV is a bit concerning on first glance, but the presence of multiple tough B3+1SD shooting set ups and good guided missile package offsets this somewhat. The Beasthunter and Moonraker in concert with the guided missile package makes for decent suite of asymmetric threats.
Despite only running fourteen troopers, this list has a rather frightening number of total orders at it's disposal. Considering the three innate tac-aware orders and the two LT orders that can be utilized by the Silverstar core team with the Vicocq's NCO, it has nineteen orders - of which fifteen are available to the first and main group.
I won the LT roll off and decided to pick deployment. In response my opponent chose to go first. My logic was mostly based around the strong second turn favored nature of Superiority, and my confidence in weathering a turn one alpha strike from TB. While Maggie is very vulnerable to the Wrecker, I believed that with a careful reserve deployment of Maggie and with the use of the Nadhir I had a strong chance to keep Maggie alive going into the bottom of turn one. I also thought that if my opponent was running a list centered around the Silverstar Prime that I would be in a very favorable position from a list match up perspective, as my understanding is that those kind of lists typically do not wrong strong AP sources consistently capable of busting a TAG.

My selection of the deployment zone was based on a few factors. I felt the cover across the DZ I selected was better, with less potential for a unit breaking into my DZ to gain line of fire on the majority of my list. I also felt it had strong potential positions for my Muttawi'ah (circled in red), strong potential positions for my Nadhir (circled in orange), and spots where I could at the very least hide Maggie from a large part of the table and try and force engagements at extreme ranges, depending on how my opponent deployed (circled in green).


After we both requested a speedball and I stripped two orders from my opponent's first group, my opponent's first move was to advance the Wrecker duo. In the process they discovered and destroyed the Fiday - but took about 4 orders to do so. I was ultimately ok with this exchange, it being a net order negative exchange for my opponent, and it took more orders away from my opponent's attack on more important pieces - namely Maggie.


This is obviously a very bad thing - and even if I played to my best afterwards, I doubt that I would have been able to pull out a win. It means that I didn't have anything to reliably threaten the Wreckers for the rest of the game - especially given that my hacker had already been killed, and that my list didn't have any LoF blocking. This sequence had also already eaten the majority of my order pool. But I think I made something of a massive mistake right after this that twisted the proverbial dagger.


So, what lessons can be drawn from a game where exceptionally unlikely dice were central to the outcome?
I think the first is that even in very very bad game states, there are optimizations that could have been made to give myself a better chance, or at the very least a better score for tournament purposes. The Ragik misplay has already been discussed, but outside of that I could have better minimized the damage I could have taken against the Beasthunter by attempting to discover it earlier. I think also I concentrated my Muttawi'ah too centered, too focused on protecting the Maghariba - while I was afraid of a potential reserve drop Hippolyta, but with Maggie already looking across a large part of the table that was always unlikely.
I also think that despite the end result of this game, this list and this set up has potential. Despite this table being extremely hostile to Maggie's bulk and the double Wrecker perhaps being the ideal active turn set up to destroy Maggie, she was able to survive into my turn unscathed. There is the factor of the Key Ops dodge buff, but I think even without that Maggie would have been ok.
There are some adjustments that could be made to this list, however. I think a source of LoF blocking is needed, and the list also needs another unit capable of putting down tough targets aside from just Maggie. Both of these additions to the list essentially render Maggie less of a lynch-pin, meaning that losing her in a similar manner to this game will be less disastrous.

This strikes me as a stronger permutation of the list I utilized in this game. While the loss of the Barid KHD is a very material one and the loss of the Ragik means this list loses a bit of flexibility, the Asawira Discoballer I think is a very worthwhile addition. Aside from being a source of LoF blocking, the Asawira is also a rather brutal close assault unit with it's B3 BSG and strong CC kit. The Discoballer having limited ammo is also somewhat offset by baggage on the Maghariba.
So, despite the rather unfortunate game there are lessons to be learned, and there is still a lot more of Vanilla Haqqislam to explore.
Thank you so much for taking the time to read this! I've never really done anything like this before, so I'd massively appreciate any kind of comments or feedback!


Love the retrospective. Do you find you use all your command tokens each game with this setup?
ReplyDeleteIt tends to be reasonably command token heavy if I'm going hard on hacking and guided, but less so than other vHaqq setups that tend to have more irregs in group one.
ReplyDelete