So the final game I played for the first round of the current casual IGL was on the face of things a bit strange as it was a mirror match - vHaqq vs vHaqq - and even with both our lists sharing the same centerpiece units. Despite this I think this was the most informative out of these round one games - with it being a useful demonstration of the versatility of vHaqq and an illustration of some of my poor tactical tendencies that can put me at a disadvantage in terms of scoring and positioning even when I have a material and order pool advantage.
For an elaboration on this current IGL and the mission Superiority, check out the first batrep I did for this round.

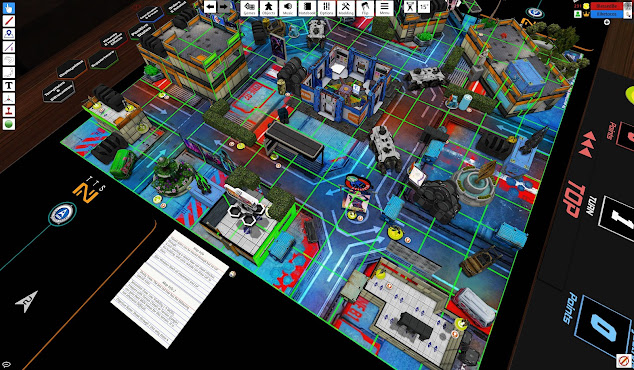
The map that we rolled is one that I've played a few times before - I believe it was made in 2023, but my first experience with it was in IGL's 2024 satellite tournament where it was used for last launch. It is a relatively open map, with long firelanes and strong elevated ARO positions. The central objective room (highlighted by the pink) divides the map into two open lanes, while giving shorter ranged pieces a large piece of cover to play around. The boxes highlighted in yellow and red give the bottom player strong forward positions where units can get closer to the midfield without exposing themselves too much, or serve as a strong bunker from which soft AROs can zone out enemy attackers.
The large building on the right (highlighted in orange) serves a similar role for the top player, but also serves as an extremely powerful position for mobility skill attackers to play from. Extending up to a maximum of three stories, the building allows for climbing plus and especially super-jump attackers to find angles on tucked away enemy units, and potentially quickly progress into the opponent's DZ.
Both DZs have a distinct set of advantages and disadvantages. The bottom DZ has stronger access to the midfield on both sides of the table with the highlighted forward boxes, and the bottom left building that extends outside the DZ. The bottom DZ is more protected against direct DZ to DZ threats, but has more cover and play for airborne deployment troops - where the opposite is true for top DZ. The top DZ also has worse map wide access to the midfield, but easier access to the large highlighted building in the right - which can be a lever with which you can bend the entire game around. The top DZ also has somewhat more constrained deployment, with the furthest 4" of the DZ being rather sparse in terms of cover.

This was the list I utilized for this game. This is perhaps the most greedy of the lists I have played so far, with only the two Muttawi'ah serving as dedicated defensive pieces. It's also the most reminiscent of how I liked to approach vHaqq in N4, which was heavily reliant on Muttawi'ah for defense, and was able to both absorb damage and present strong offensive capabilities through having many potential avenues of attack - in other words, it was based around threat saturation.
The Mukhtar duo is a very classic set up, and remains so into N5. The only real point of note with the duo is how it benefits from N5's fireteam rules, gaining +1SD in ARO. This could potentially make the duo useful in ARO depending on the situation. The Contender Bashi Bazouk is a piece I have elaborated on in a previous battle report and Azra'il is a rather obvious piece as to it's capabilities and use case, so I will skip to the two most unique inclusions in this list - the Asawira Doctor, and the Khawarij AP Spitfire.
While the issue of durability for the price still plagues the Khawarij, the unit has seen some improvements in N5 that have made it a contextually powerful unit. In terms of the more minor improvements, immunity (arm) gives the Khawarij a larger degree of survivability and GML resilience - especially when paired with a doctor and speedball. The decrease in prevalence of direct templates is also something of a minor improvement for the Khawarij, making it's still situational close combat kit less situational, and making it's movement a tad easier. The biggest improvement however is obviously the new super jump, which allows the Khawarij to achieve mobility second only to the hoverbikes. In this particular list, the idea of the Khawarij is to give another threatening AP source that can potentially shoot down TAGs and heavy infantry, while contrasting the Azra'il with it's extreme utility. The mobility of the Khawarij also gives it the ability to potentially find angles on tucked away units while also being able to pull back to safety in just a few orders.
The Asawira Doctor provides both a unique offensive and defensive capability for this list. On the offensive, the Asawira with the DA CCW remains a potent threat even into N5. It is one of the few units to benefit in a way from the berserk change, with berserk (+3) giving it a better F2F. It still has a nanopulser to fork with, while a B3 BSG also has serious killing potential if it gets into range. The Nasmat can also be a powerful augment to the Asawira's close combat capabilities, as it can provide the Asawira with +1B if it gets into base to base contact with the same target. On the defensive, the Asawira is something of a safety net for the rest of the list. It is perhaps even more resilient in N5 thanks to spotlight now having an associated save versus BTS, while having the ability to revive the Azra'il and Khawarij force more investment into attempts to kill those units. The Asawira can also be deployed somewhat aggressively in a manner to counter close assault attackers, as it is rarely central to the game plan and can be traded off.
The most obvious limitation of this list is it's limited midfield presence. The only camo infiltrator in this list is the Hunzakut, and while the Mukhtar and Muttawi'ah are capable pieces for clearing and contesting a midfield, that still requires orders and it is far less capable of creating the same kind of map control as my opponent's list.

My opponent's list as already mentioned shares some key pieces. There is also an Azra'il, Mukhtar, Bashi Bazouk, and guided missile package. But despite that the style and goals of this list are very different overall. Where my list is based around threat saturation and having enough active pieces to absorb damage, this list is more concerned with establishing strong midfield control and more complete defensive tool kit.
The Hawwa is a solid midfield toolkit - nothing exceptional, but decently cheap and with a lot of utility. The cybermine and threat of a camo hacker makes for a decent midfield roadblock. The silenced pistol can find it's uses in the active turn as well. Perhaps the most notable trait of the Hawwa is the unit being AVA 2 in vHaqq. Being able to take two solid midfield camo hackers in conjunction with the other standard Haqqislam midfield and area control tools - such as Muttawi'ah and the Hunzakut - creates a powerful defensive set up on the friendly half of the table, with the potential to develop up the table.
The Sunduqbut and Nadhir are the two elements that make this list's midfield control elements especially strong. The very threat of the Nadhir forces a lot more caution when navigating the midfield and the potential for a hack-shoot fork in ARO could be game defining. The Sunduqbut, aside from granting a further defensive element with it's chain rifle and mine, also represents an extremely potent threat in the midfield that requires engagement.
The Sunduqbut is something of a strange offensive piece in it's pattern of play. A B4 viral rifle is without a doubt one of the most lethal weapons a unit can possess, and with a chain rifle and two wounds it has tremendous potential to scythe through enemies if it is capable of closing to it's preferred range. But even with forward deployment the Sunduqbut is a slow, hackable unit that requires effort and especially the use of it's one use camo to close to that range. Disrupting the Sunduqbut - especially threatening to strip it's camo before it is able to close to rifle range - can be an effective way to shut it out, and as a result requires a lot more active engagement from an opponent interested in neutering it.
So now, on to the game itself. My opponent won the LT roll, and decided to take deployment - deploying second on the bottom (blue side) of the table. After some deliberation, I decided to take first turn - hoping that I would be able to inflict sufficient damage in an alpha strike, and not confident in my ability to defend while also having to deploy first.
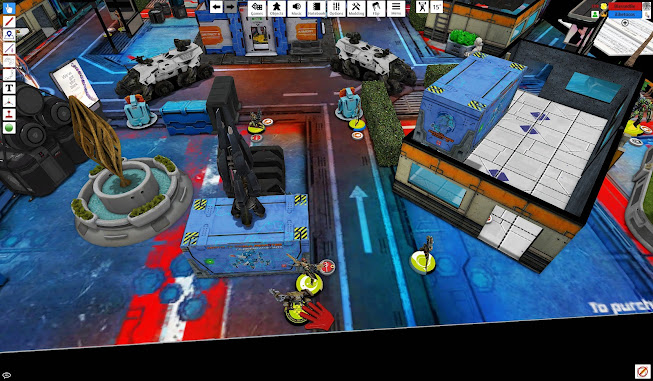
My deployment, with the Khawarij in reserve. The Mukhtar team was deployed centrally, hoping to play around the central objective room. The Azra'il and Barid were deployed with similar fire lane access to essentially ensure that regardless of how my opponent deployed on that side of the table I would be able to have an offensive response while staying at range. The Asawira was kept back, and it's nasmat placed on the other side of the table with the unit intended to act more as a defensive measure. My Hunzakut was deployed on the left side of the table to provide an option for offensive play on that side of the table. The Khawarij would be placed on the left side of the table, intending to play around the building.
There were few good offensive Fiday spots, so I decided to take the one that I figured would force the most response deployment wise. I think in hindsight this was an error, as the combination of vHaqq having strong anti-IMP tools and an unfavorable table lowered the value of the Fiday from an offensive perspective - what might have been more worthwhile was deploying the Fiday in a tucked away part of the table to essentially act as a free and difficult to remove twenty three points in a zone of my choosing.

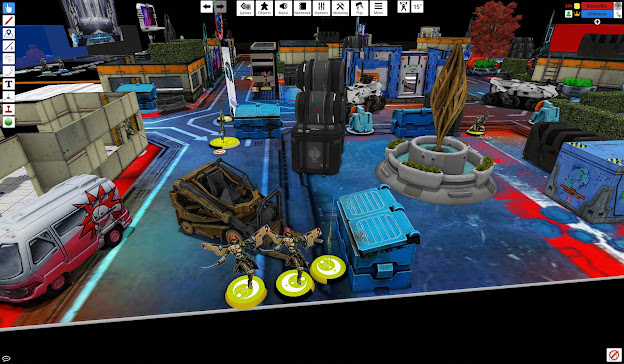
My opponent's deployment after the reserve drop (which was a Sunduqbut). The concentration of camo markers around the Fiday which included the Sunduqbut, mine and a Hunzakut were obviously intended to box the unit in and make removing it in my opponent's turn fairly trivial. Hidden by the nearby building, there was also a Muttawi'ah further discouraging an elaborate Fiday play. The Barid, other Ghulam decoy and missile bot were tucked away on the left side of the table, and my opponent's Mukhtar and Azra'il were located on the right side, far back to try and make getting on top of them difficult. My opponent's Nadhir was deployed on the leftmost building, adjacent to the blue container on it's roof. Of note also is the Hawwa hacker in camouflage on the left. We also both designated our Mukhtar Red Fury as our Key Ops, while my between the two of us only my opponent requested a speedball.

My immediate response regardless was to put down the Nadhir with the Mukhtar, which happened without much difficulty.

Unable to find a satisfactory angle for the Khawarij or the Asawira to make a close assault attack, I decided to go for a Barid pitcher play - landing a Pitcher, isolating the Azra'il, and guided missile striking one of the two decoy Ghulams. I also figured that this repeater placement would potentially limit the movement options on the Sunduqbut if it had it's camo stripped.

I decided to go for a strange and probably ill-advised attempt to strip camo from the Sunduqbut and place pressure on it to dig it out. The Fiday makes a failed discover attempt on the Sunduqbut, and manages to survive the DTW placed on it by the Hunzakut. It manages to put the Hunzakut down in the next order while still surviving. I parachute on my Bashi Bazouk, clear out the mine, but run out of orders to do much else.
I think I hyper fixated on the Sunduqbut here a bit too much. While it is a scary piece and worth trying to defang, I didn't have the orders left to properly dismantle it. This also forced me to expend my Bashi Bazouk, which could have been utilized for a more powerful attack against my opponent's missile bot, Barid and Ghulam on the other side of the table. I could have also attempted to find an angle to attack with my Khawarij. Attempting to fully brick the Azra'il could have also been a more worthwhile endeavor.
Overall, I think this was a turn one attack that did ok, but could have done so much more if I drew my attention away from the Sunduqbut. It did end up feeling especially potent at the time however, as I had managed to hit the right Ghulam, putting my opponent into loss of lieutenant for their first turn.

My opponent's first turn was mostly limited to damage control and clean up as a result of being in LoL - but in some ways, that was all that they needed to do given that I had not moved in position to contest the quadrants.
Their first action was to clean up the Bashi Bazouk, which they accomplished without a hitch utilizing the nearby Muttawi'ah. My opponent then attempted to destroy my Muttawi'ah on the other side of the table with a successful spotlight, but failed to land a guided missile.
While my opponent's Hawwa failed to put down the Fiday, the Sunduqbut was more than capable of the job, and placed a new mine down once the job was done. My opponent also utilized their Mukhtar to clean up my repeater. With just a few orders left and a decent hold on the quadrants already established by my opponent, they decided for a relatively high risk offensive play.
My opponent deployed their Bashi Bazouk in order to try and take out my Azra'il and Barid - but was unable to achieve any damage. I think I got fairly lucky here - this attack could have very easily been devastating. I think a simple preventative measure would have been to keep my Mukhtar standing up, holding one of the long width wise angles that both would have been relatively safe from my opponent's gunfighters.


With the Mukhtar only able to force the Bashi Bazouk to guts to cover, I activated the Asawira to clean up the Bashi, and decided that the Asawira was in a strong position to try and deal with the Sunduqbut.

While the Asawira was isolated for it's troubles, it was able to engage the Sunduqbut and deal a wound to it before I ended up running out of orders. I think again my hyper fixation on the Sunduqbut worked against me here, where the orders could have been better spent in a positional capacity.

After clearing the already spotlight Muttawi'ah with their guided missile bot, my opponent then moved their Kameel into the zone, outscoring the Hunzakut thanks to baggage.

My opponent was then able to clean up the Asawira with their Mukhtar, but put the Sunduqbut down into unconscious in the process. My opponent didn't need to do much more on their turn aside from pressing a nearby button with their Hawwa, still holding the quadrant advantage.

Moving into the final turn, I activated the Mukhtar duo and quickly moved them up the table, splitting off the Red Fury Mukhtar to gun down the Hawwa, Kameel, and put the Sunduqbut into dead.

I utilized the Mukhtar and Barid hackers to get more buttons pressed, before tucking everything away and trying to hold enough quadrants to overcome my opponent's score advantage.

However it simply wasn't enough, and despite being down in victory points and orders, it only took a few orders of just movement for my opponent to reposition to successfully control enough quadrants to win the game, with the final score being 6-4 in their favor.
So, what happened here?
Outside of the hyper fixation on the Sunduqbut which I have already discussed, I think my ARO positioning was not aggressive enough on turns two and three. While I had not removed my opponent's Mukhtar, their Azra'il was effectively out of the game thanks to being isolated and too far back to engage in any meaningful gunfights. Spending the orders to move my own Azra'il, guided missile bot and Mukhtar duo to go on ARO in order to constrain my opponent's movement would have been a better use of orders than for example, attempting to remove the Sunduqbut with the Asawira. Even if I ended up losing some of these units as a result of this, I still would have had a doctor, and a backup gunfighter in the form of the Khawarij which I think I severely underutilized in this game.
From a list building perspective, this list was obviously not especially suited towards the mission. My opponent's utilization of camo infiltrators and especially the expensive Sunduqbut gave them a strong scoring presence from deployment, where I had to budget orders and think ahead in terms of positioning to try and get into the quadrants.
Finally, I think I could have and should have picked second turn. I underestimated just how second turn favored this mission can be - the quadrants proving much easier to take control of compared to the width wise slices of a zone control mission like frontline. I also think that I was too afraid of being alpha striked - after all, this list is capable of reasonably defending most things that vHaqq can throw at it, and has built in redundancy.
To sum up, I think myself not posting any AROs on turns two and three, the differences between my list and my opponent's list, and my choice of first turn were the key factors in why this game ended the way it did. My opponent, despite taking far heavier losses, was able to simply swat back my attempts to establish quadrant control and position themselves, never having to move up the board and make a concerted effort to dislodge one of my positions.
Regardless, this was a tense and fun game, and I very much enjoyed it even despite it being a mirror match.
Thank you for reading, and please comment below if you have any questions, feedback or general responses.


